Changing your car's oil is a fundamental maintenance task that can significantly extend the life of your engine. Performing this yourself can save you money and give you peace of mind, knowing it's done correctly. This guide will walk you through the process, from gathering supplies to safely disposing of old oil.
Gathering Your Supplies and Preparing Your Vehicle
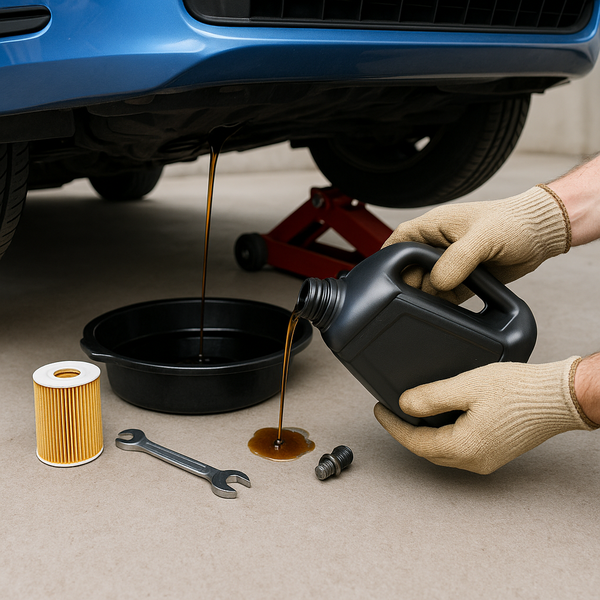
Before you begin, ensure you have all the necessary tools and materials. You'll need a new oil filter that matches your car's make and model, the correct type and amount of new motor oil (check your owner's manual for specifications), a wrench to remove the oil drain plug, an oil filter wrench, a drain pan, a funnel, rags or paper towels, and safety gloves and glasses. It's also advisable to have a sturdy jack and jack stands if your vehicle requires lifting for access. Park your car on a level surface and engage the parking brake. If you need to lift the vehicle, use the jack at the designated points and secure it with jack stands for safety. Allow the engine to cool down for a bit, but the oil should still be warm to flow more easily. A warm engine facilitates a more complete draining of the old oil, removing more impurities and sludge from the engine's internal components. This preparation is crucial for a successful and safe oil change, ensuring you have everything at hand to avoid unnecessary interruptions or risks. Always double-check the type of oil and filter to prevent damage to your engine. Referencing your vehicle's owner's manual is the most reliable way to confirm these specifications. Safety first is paramount; never work under a vehicle supported only by a jack. Make sure the drain pan is large enough to hold all the old oil.
Draining the Old Oil and Replacing the Filter
Locate the oil drain plug on the bottom of the oil pan. Place the drain pan underneath it. Using the appropriate wrench, carefully loosen and remove the drain plug. Be prepared for the hot oil to start flowing out immediately. Let the oil drain completely, which might take several minutes. Once the oil has finished draining, clean the drain plug and its threads with a rag. Inspect the drain plug for any damage. Some drain plugs have a crush washer that should be replaced with a new one each time to ensure a proper seal and prevent leaks. Reinstall the drain plug and tighten it securely with the wrench, but be careful not to overtighten, as this can strip the threads. Next, locate the oil filter. Position the drain pan beneath the oil filter, as some oil will likely spill when it's removed. Use the oil filter wrench to loosen and remove the old filter. Ensure it's completely off the engine. Before installing the new filter, apply a thin layer of new oil to the rubber gasket on the top of the new filter. This lubrication helps create a good seal and makes future removal easier. Screw the new oil filter on by hand until the gasket makes contact with the engine, then tighten it an additional three-quarters to one full turn, or as recommended by the filter manufacturer. Do not use the oil filter wrench to tighten the new filter, as this can damage it and cause leaks. Ensure the old filter is disposed of properly.
Adding New Oil and Checking the Level
With the drain plug reinstalled and the new oil filter in place, it's time to add the new motor oil. Open the hood and locate the oil fill cap, usually marked with an oil can symbol. Remove the cap and insert the funnel into the opening. Carefully pour in the recommended amount of new oil, as specified in your owner's manual. It's better to start with slightly less than the full amount and add more as needed. Once you've added the oil, replace the oil fill cap securely. Now, start the engine and let it run for about a minute. This allows the new oil to circulate throughout the engine and fill the new oil filter. While the engine is running, check under the vehicle for any leaks around the drain plug and the oil filter. If you see any drips, turn off the engine and tighten the plug or filter as necessary. After the engine has run for a minute, turn it off and wait for a few minutes (usually 5-10 minutes) to allow the oil to settle back into the oil pan. Remove the dipstick, wipe it clean with a rag, reinsert it fully, and then pull it out again. Check the oil level on the dipstick. It should be between the 'add' and 'full' marks. If the level is low, add a small amount of oil at a time, rechecking the level after each addition, until it reaches the full mark. Do not overfill the oil, as this can cause engine damage.
Final Checks and Proper Disposal
Once you've confirmed the oil level is correct, close the hood. It’s good practice to take your car for a short drive and then recheck the oil level and look for any leaks once more. This final check ensures everything is sealed and functioning as it should after the maintenance. Proper disposal of used motor oil and the old oil filter is critical for environmental protection. Never pour used oil down drains, into sewers, or onto the ground. Most auto parts stores, service stations, and local recycling centers accept used motor oil and filters for recycling. Store the used oil in a sealed container, such as the empty new oil bottles or a dedicated used oil container, and transport it to an authorized collection facility. Many communities have designated hazardous waste drop-off sites that can handle these materials. Recycling used motor oil saves a valuable resource and prevents pollution. Check with your local authorities or environmental agencies for specific disposal guidelines in your area, as regulations can vary. Keeping a record of your oil changes, including the date, mileage, and type of oil used, can also be helpful for tracking your vehicle's maintenance history and ensuring you stay on schedule for future changes. This diligent approach to maintenance and disposal contributes to the longevity of your vehicle and the health of the environment.
When to Change Your Oil and Why It's Important
The frequency of oil changes depends on several factors, including your vehicle's make and model, the type of oil used (conventional or synthetic), and your driving habits. Your owner's manual will provide the manufacturer's recommended service interval, often expressed in miles or months (e.g., every 5,000 miles or six months). Modern vehicles, especially those using synthetic oil, can often go longer between changes than older vehicles. However, it's crucial to adhere to these recommendations. Driving conditions also play a role; if you frequently drive in stop-and-go traffic, short trips, or extreme temperatures, your oil may degrade faster. In such cases, you might consider changing the oil more frequently. Motor oil is the lifeblood of your engine. It lubricates moving parts, reducing friction and wear. It also helps cool the engine by carrying heat away from critical components, cleans the engine by suspending dirt and debris, and protects against corrosion. Over time, oil breaks down, loses its lubricating properties, and becomes contaminated with combustion byproducts, metal particles, and sludge. Running an engine with old, degraded oil can lead to increased wear, overheating, reduced performance, and eventually, catastrophic engine failure. Regular oil changes are one of the simplest and most effective ways to maintain your engine's health and ensure its longevity, saving you from costly repairs down the line. Don't neglect this vital maintenance task; it's an investment in your vehicle's future.